


Table of Contents
Introduction:
Are you struggling to “Verify Meta Business Suit” (BM) account? Look no further! In this complete guide, we will walk you through the process of verifying your business manager account step by step. Understanding the basics is important, so let’s go into the world of Meta and get your business manager account verified.
Understanding Meta Business Manager:
Before we go deep into verifying your Meta Business Manager account, it’s essential to establish a solid understanding of the platform and its fundamental terms. Meta Business Manager is like the control centre for businesses on platforms like Facebook and Instagram. It helps you handle everything in one place, making it easier to manage ads, pages, and other important stuff.
12 Steps to Verify Meta Business Suit:
Make your online presence stronger by easily following these twelve steps to verify your Meta Business Manager account. Keep an eye on your email for updates. Don’t forget that having a correct business profile and a website with a custom email is important for a smooth verification process.
Step 1: Accessing Business Settings:
From your Business Page Settings, Start by Clicking on the “Business Settings” icon. This will open up your Business Manager Account settings.

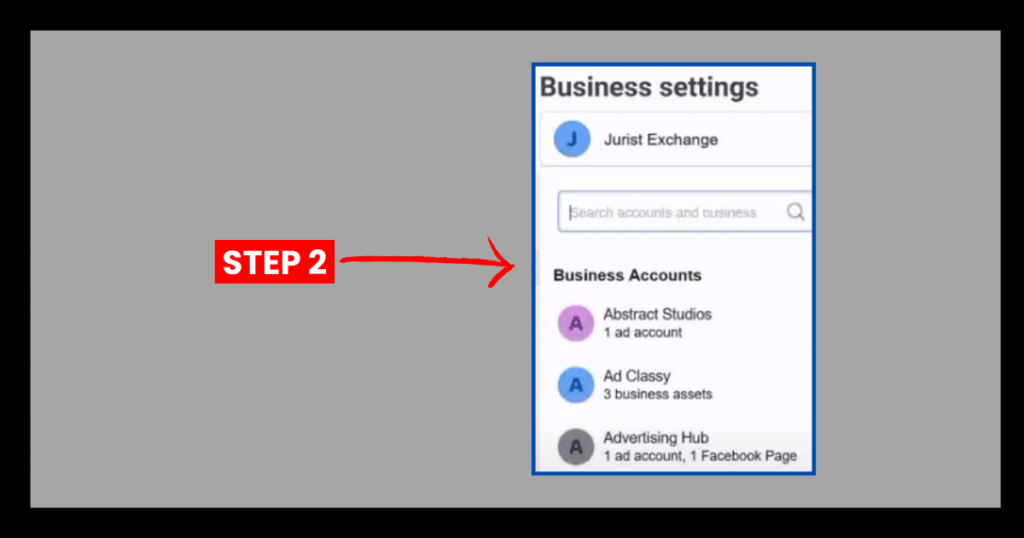
Step 2: Selecting the Business Manager Account for Verification:
From the Business Settings, Choose the Business Manager Account which you want to verify.
Step 3: Guiding to the Security Center:
Scroll down until you find the “Security Center” button. Click on it to access the section where you can verify your Business Manager Account.

ALSO READ THIS How to Make a New Facebook Page?
Step 4: Confirming Eligibility for Verification:
Check if your Business Manager Account is “Eligible for Verification.” If it’s eligible, proceed to the next steps. If not, then make it eligible from the Business Info section by entering your Email and receiving a Facebook Verification Code.

Step 5: Filling in Business Info:
Go to “Business Info” and click on the Edit button. Fill in your business details, ensuring accuracy. Save the information; this step is important for the verification process.

Step 6: Returning to the Security Center:
After updating your business info, go back to the Security Center by clicking on it.
Do You Know How to Remove Myself as Admin On Facebook Page?
Step 7: Initiating Verification:
Click on “Start Verification” after confirming your eligibility. This marks the beginning of the official verification process.

Step 8: Verification Process:
Read the instructions carefully, then scroll down and click on “Get Started.” Fill in the required details, choosing the email verification option for a faster process.

Step 9: Document Upload:
Upload your business registration or license document containing your business name and address. This step is necessary to validate your business.

READ THIS ALSO What Size Is a Picture On Facebook? Facebook Dimensions
Step 10: Confirmation of Document Details:
Confirm whether the document contains your phone number or address by entering your customized Email address associated with your website. Proceed accordingly.

Step 11: Email Address Confirmation:
Verify your email address by entering the One-Time Password (OTP) sent to your customized email associated with your website.

ALSO READ THIS How to Add WhatsApp Button in Facebook Posts?
Step 12: Submission and Review:
Once the verification process is complete, your application will be submitted for review. It may take a few hours to several days for the review process.

Last Words:
Congratulations! You’ve successfully initiated to “Verify Meta Business Suit Account.” Keep an eye on your email for verification status updates. Remember, having accurate business information and a website with a customized email is key to a smooth verification process.
ALSO READ THIS Why Does My Facebook Keep Jumping Around?
FAQs (Frequently Asked Questions)
How to Verify Meta Business Manager Account?
12 Easy ways to Verify Meta Business Suit Account.
1. Accessing Business Settings.
2. Selecting the Business Manager Account for Verification.
3. Guiding to the Security Center.
4. Confirming Eligibility for Verification.
5. Filling in Business Info.
6. Returning to the Security Center.
7. Initiating Verification.
8. Verification Process.
9. Document Upload.
10. Confirmation of Document Details.
11. Email Confirmation.
12. Submission and Review.
Why am I unable to authenticate my Facebook business account?
Your business verification submission has been declined.
Possible reasons for this could be: Providing, or being suspected of providing, inaccurate or deceptive information. Trying to assert or validate a Business Account that you neither own nor have the authority to represent. Attempting to bypass Meta’s verification review system.
Who qualifies for Meta Verified?
To enroll your profile in Meta Verified, you must meet the following criteria: Be a minimum of 18 years old and have a profile that satisfies the minimum activity requirements, including a history of previous posts.
Is Meta Business Account free?
Yes, Meta Business Manager is a free service. To begin, ensure you have a personal Facebook account for identity verification. Then, establish a Business Account to efficiently organize and centralize your business assets, including Pages, ad accounts, Instagram accounts, and catalogs.